Showing posts with label DIY. Pinterest. Show all posts

Tuesday, November 19, 2013

Day 28 DIY Holiday Snowglobe Snowman, Christmas gift

Day 28 Holiday Snowman Snowglobe :)


I made these little guys after I did the snowglobe reindeer in my previous post .. so cute ..  This little snow globe would make a lovely gift or decoration and kids will love to make it as well for a fun Christmas craft!
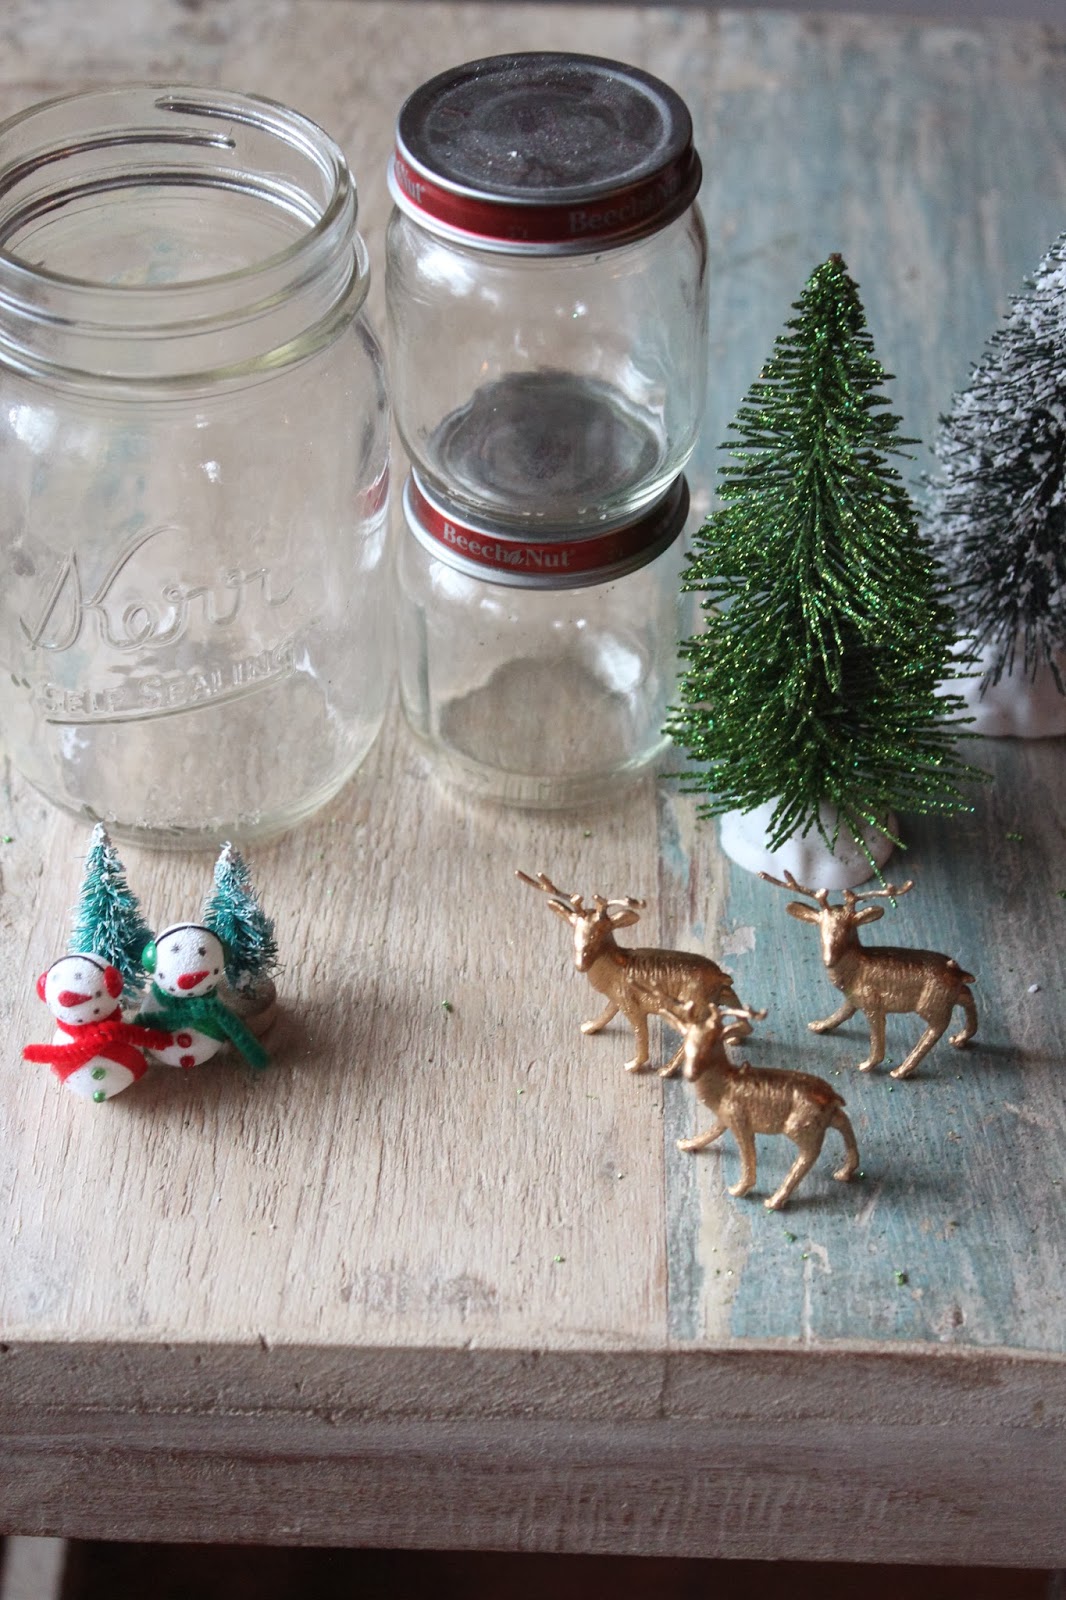


What you will need;
~ a jar, I used a baby food jar reduce reuse recycle
~ glue gun and liquid glue (I used E6000)
~ burlap, mine was from Michaels and has this amazing gold glitter too it!
~ snow flakes you can find at most dollar stores or craft stores
~ Twine or ribbon (mine is from Micheals, its hemp twine with metallic threads .. sparkle!)
~ miniature figurines .. at this time of year they are everywhere, mine are from AC Moors
~ a small piece of wood or foam 1"
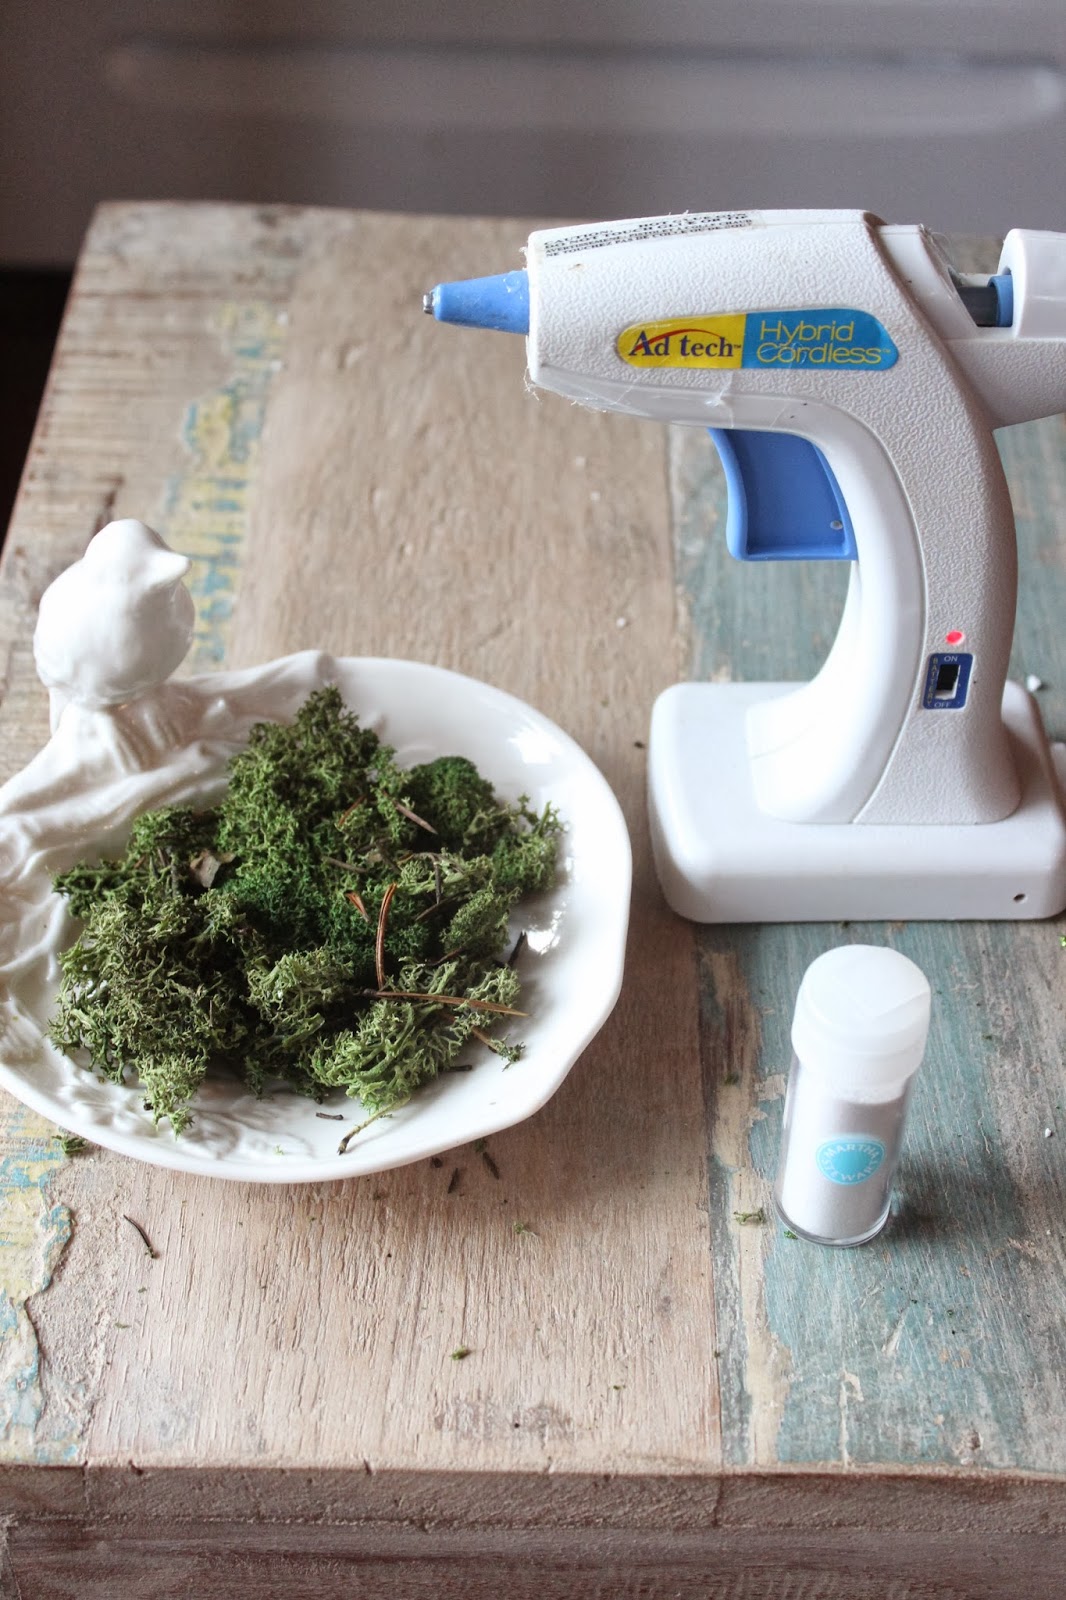
~ glitter!  

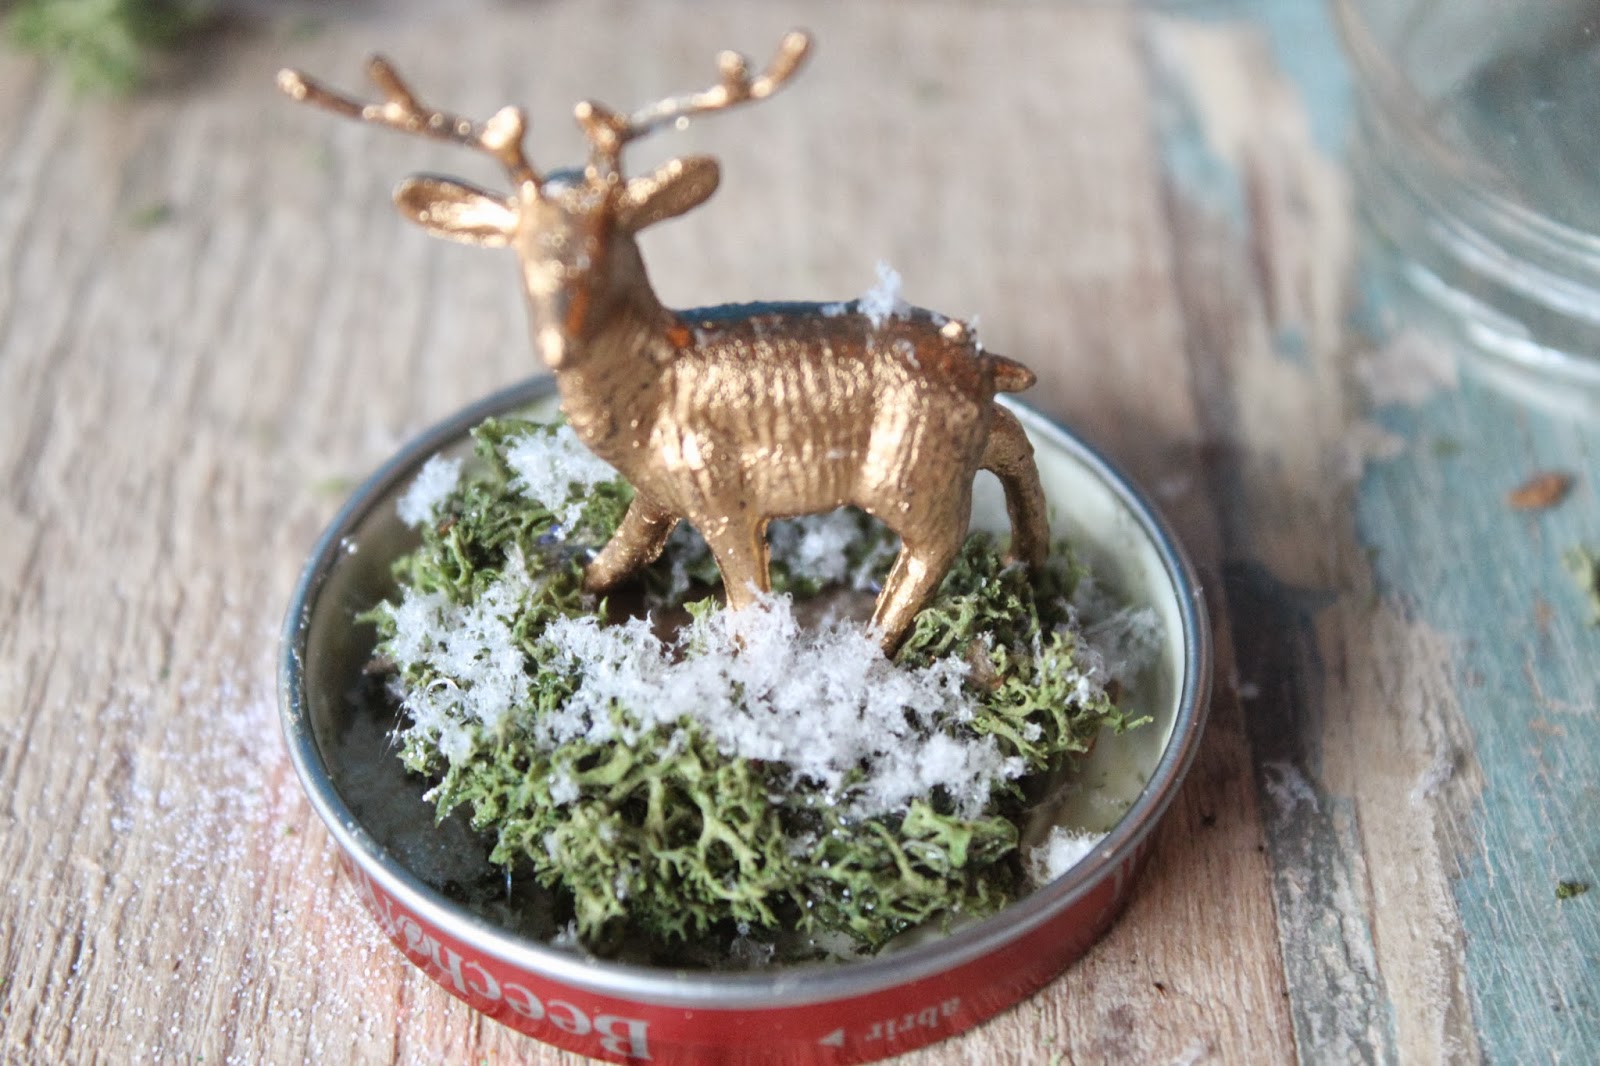
Your scene will be set on the inside of your lid as your jar will be upside down. glue your wood or foam to the inside of the lid, your snowman will stand on this .. it will give him height so he is not hidden under the lip of the lid.


                 Next Glue your snowman and tree to your wood.  
I used a glue gun.


Now take your liquid glue .. I used E600, and cover your wood and whatever part of the lid shows .. again making sure to leave room for the jar to fit ontop.


let it snow .. 


cover your scene in snow and puch it down with your fingers so it can attach to the glue, of course you'll still have lots of loose snow for flurries :)


Glitter time .. sprinle your glitter on top, as much as you'd like.


I added these amazing gold and silver glitter stars too


 put your jar on top .. its good to add a little E6000 to the track so no little ones can unscrew it.


now measure your burlap piece .. aout 1/2" larger then the lid or enough to cover whatever size your lid is.


Glue your burlap onto your lid.  I put one dot of glue in the center of the lid and then worked in sections glueing along the outer edge of the lid.


look at how pretty it is with the gold thread!


Lastly wrap your twine or whatever ribbon you choose around the burlap ..
I used white with silver thread :)


walaa! whimsical, cute .. I love this!


Day 27 Snowglobe Reindeer

Day 27 Reindeer Holiday Snowglobe 


Im so excited Christmas is coming I want to make all sorts of pretty whimsical gifts for family and friends .. so all my crafting from here to Christmas will be lovely holiday treats! I bought these super cute little reindeer and some 'reindeer moss' .. thats what its called.  I decided to make snow globes with them since I loved the little necklace so much.


What you will need
~ mini reindeer.  I found mine at AC Moores but around his time of year you can find pretty miniatures everywhere .. (I also found thise teeny trees and snowmen)
~ Reindeer Moss .. most craft stores carry this .. its real moss .. so pretty
~ glue gun
~ Jar .. I used a baby food jar but if you want to get fancy Michaels has all different shapes and sizes.
~ Snow dust (craft store)
~ fine white glitter (craft store, I used Martha's)
~ Burlap .. I bought this gorgeous burlap with gold threads running through it at Michaels .. sparkle sparkle
~ Hemp Twine, Michaels .. also has gold and copper threads running through it :)
~ I tiny piece of wood

Lets begin
You'l be creating your scene on the lid of the jar.  Start by making sure your wood fits into the lid and the jar still closes on top.  The wood will give your reindeer a little height so he does not get lost under the lid.  Glue on your wood with a glue gun .. make sure the top is flush with the lid or your deer will stand crooked.


Next glue your deers we little hoofs to the wood ..


Begin to moss ify.  I took very small bits of moss, dropped a little glue on the bottom and added them to my wood and lid. 


 Make sure you do not add to much so your lid can still close when the jar is placed on top.


pretty .. now let it snow .. add your snow dust.


... now a little magic shimmer, what is a craft without glitter??  


I added these tiny red sequins as well .. I wanted a pop of color that looked like berries.


Now measure your lid on the burlap.  I traced it with a pencil, but Martha has a disappearing marker that I need to get, perfect for something like this. 


cut about 1/2" around the circle or whatever length will cover your jars lid.


look at the pretty sparkle!


Now small sections at a time apply your glue and attach your burlap to your lid.

Tie on your hemp .. of course you can use and string or ribbon your like ..


shake a little to get a shimmering storm started around your deer .. the glitter will catch on the glass just enough for the whimsy effect.


Walaa . so pretty!  Your reindeer snow globe.  

favorite thing ('these are a few..');


... love this over sized clock I just found at Home Sense .. Im doing the French Provincial look for my new house .. my husband just put in those hardwood floors you see and that beam is made of 200 year old barn wood we found when we removed a wall (along with lath and plaster, my new house is 203 years old)


Monday, October 28, 2013

365 Days of Pinterest Day 24 ~ DIY ZOMBIE schoolgirl costume!!!

365 Days of Pinterest Day 24 ~ DIY ZOMBIE schoolgirl costume!!!


ahhh Halloween, I love it so much I even gave birth to my daughter on Oct 31! My little pumpkin .. This costume was actually from last Halloween, but it is my favorite so I want to share... I found a pin on pinteret for the Zombie schoolgirl .. it was a costume from Spirit Halloween.  Of course the skirt was much shorter and the shirt was hiked up past the belly button .. so I scowered the second hand stores in my neighborhood and loved what I came out with 


What you'll need
-'Zombie' Contact Lenses from Spirit Halloween ... you can also purchase them here
-plaid skirt
-white button up
-tall white socks
-little jacked
-neck tie
-fake blood.  I like this kit because it has the blood you can put in your mouth and alo the blood you can splatter on your cloth 
-I used this flesh latex makeup on my hubby .. really easy to use
- white grey red and black makeup for shading


original costume from Spirit


The contacts are what really made the costume complete.  There are some cheaper brands then the link I provided above, but they are not as thick so the color is not as strong.  Its worth it to invest in the good ones, not only for the color, but they are thicker and less likely to tear .. they also last for 3 years if stored properly where the others last for 21 day .. 


 face .. I started with my normal makeup and then applied white and grey to my skin .. black and then red around the eyes .. black at the cheekbone for the unkin in look .. then comes the blood .. I flicked it on my face for the splattered I just bit into a juicy leg effect and then dripped it out of my mouth.


the steps are pretty basic ... cut up your close creating frays and jagged edged .. splatter with blood ... wa laaaaa!!


I ate my husband wish didn't make much sense because zombies dont eat zombies .. but ok 


my sister in law is awesome!!!


this was my daughters dead rag doll costume from a few years back .. pretty fun ")