Thursday, January 31, 2013

365 Days of Pinterest Day 8 ~ Origami Balloon Twinkle Light

Pin 8
~
Origami Balloon Twinkle Lights


 For pin #8 I choose something I know I'll love, Origami Twinkle lights .. I actually made these for my daughter last Christmas   I saw them on Etsy and again thought to myself ... I can DIY this!  This is one of my favorites so far .. I just love twinkle lights!  


WHAT YOU WILL NEED

~origami paper ;  I purchased a pack of 10 from Micheal's for $12 ... I know I choose the most expensive paper .. but its lovely!!  There is also large packs of 50 for $15 and smaller packs of 15 for $10.
~twinkle lights ~ I choose white cord 'icicle' lights


my paper is very thin with great detail ... I knew the light would look gorgeous glowing through this.


Begin with your paper lying flat


 fold your paper tip to tip ... crease well and then open it


Do the same in the opposite direction, tip to tip then open it again .. you will have an 'x' folded into your paper .. this is called mountains and valleys :)


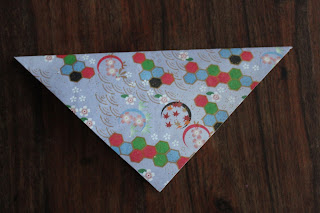
Fold your paper down in half


Bring the upper right corner in as shown


repeat on the other side .. remember to press down firmly along each fold 


Fold the flaps to the top as shown on both left and right side


This is what your paper should look like so far


 Flip it over and repeat on the other side to make a diamond shape (press creases firmly)


Fold the right and left corners to the center of the diamond


flip and repeat on the opposite side


Tuck the loose flaps into the folds you just made and press crease firmly .. 


Flip and repeat on the opposite side (you will do this twice on each side)


at the end of the diamond that you did not tuck the flaps into you will have a hole.  


 Blow into the hold to inflate your balloon :)


There you have it!


 now stick your twinkle light into you balloon .. I actually secured them with a small drop of glue gun glue.


  wa laaa!!  pretty glowing whimsical lights!


I LOVE THEM


Verdict .. Great pin .. at first it may seem confusing  but once you get the hang of the folding you can complete a balloon in under 2 min .. its actually really relaxing to make them, especially if you are working with all sorts of gorgeous papers ..  and the lights are so pretty .. I have them in my living room, they add such a pretty warm glow .. YAY!!  awesome pin :)


Wednesday, January 30, 2013

365 Days of Pinterest Day 7 ~ Dr Ozs Weight - Orade Weight Loss Tea


Dr. Ozs Tangerine Weight-Orade.
Dr. Oz Recipe


Original Pin
http://pinterest.com/pin/267119821620392630/


Day 7 of my 365 Days of Pinterest ... I chose the popular weight loss pin ... Dr Oz Weight - Orade.  I actually began this a week ago so I could track my progress.


WHAT YOU WILL NEED
Green Tea
Fresh Mint
Tangerines


Here is the science behind the theory straight from Dr Oz web site
http://www.doctoroz.com/videos/diets-every-decade

"It contains: green tea, shown to boost metabolism 12% by drinking just one cup; tangerine, with a chemical composition that increases sensitivity to insulin and stimulates genes that help to burn fat; and mint, a calorie-free flavor enhancer."


In a large pitcher, combine:
  • 8 cups of brewed green tea (I brewed 5 tea bags)
  • 1 tangerine, sliced
  • A handful of mint leaves

Stir this delicious concoction up at night so all the flavors fuse together. Drink 1 pitcher daily for maximum metabolism-boosting results.


 Verdict.  I love the tea .. its refreshing and light.  Its no magical weight loss elixir  but it helps throughout the day to manage my snacking.  I feel healthy as well drinking the tea over a diet coke.  I did loose 2 pounds but I have lowered my calorie intake.  I do think the tea helps.  

Note*  Green Tea is a diuretic so I make sure I drink alot of water throughout the day.  Also I am a vegetarian with an iron deficiency and green tea is said to block non meat iron absorption so I take my iron supplement before bed not having consumed the tea 2 hours prior and 5 hours after.

Overall I think the tea is a good addition to a healthy life style and is great to add to any weight loss routine.
   :)


Tuesday, January 29, 2013

365 Days of Pinterest Day 6 ~ "Balloon Chocolate Ice Cream Bowls"

365 Days of Pinterest Day 6 
"Balloon Chocolate Ice Cream Bowls"


My daughter picked this pin ... Iv never melted chocolate before so I enlisted my mothers help .. a seasoned chocolateire :)

This is the original pin 


http://pinterest.com/pin/267119821620330856/


WHAT YOU'LL NEED
Chocolate melting wafers.  I used 2 cups for 6 balloons
Small Balloons / Water Balloons
cooking spray
wax paper


1. Blow up your balloons.  I made them small for smaller bowls .. 


2. Wash and dry balloons, make sure dried well as water drops will seize up the chocolate.  Spray your balloons lightly with non stick cooking spray .. too much spray will make the chocolate slide off.


3.  Place your chocolate in a microwave safe bowl .... 


... I used bars but remade the cups with chocolate melting wafers which worked better .. set firmer.


4. Microwave your chocolate  in sets of 20 seconds.  After each 20 seconds allow your chocolate to sit for 10 seconds.  Then stir and microwave again for 20 sec.  Repeat this process until your chocolate has melted completely.


5.  Spoon a teaspoon of melted chocolate on your wax paper.


6.  DIP!! ... 


7.  Place your dipped balloon onto the chocolate base you spooned onto the wax paper.


8.  Let your balloons set in the refrigerator   As I said, the melting chips set firmer and faster then the chocolate bar.  30 min should do but check to make sure they are firm.


9. pop!


10. Fill :)


Verdict.  Easy and fun!  Remember chocolate melting wafers work better then bars.  We are going to make these with white chocolate and add fresh strawberries and whipped cream in them on Valentines Day!